UX Designer & Textile Graphic Artist
The Mezzanine 650 System
A Multi-Level Analysis of the OBLONG Industries presentation and collaborative system at the University of North Texas.
This is a large team assignment develop as part of UNT IXD curriculum
Role
User Researcher I Tester I Collaborator I Contributor
Tools
Adobe Suite I Mezzanine system
Background
The Mezzanine 650 technology suite is a product of Oblong Industries that aims to enhance collaboration, primarily in office environments. The system employs a series of connected displays that allow users to share and manipulate content across and in 3D space using remote-control wands. The following report examines how the system is utilized at the macro, mezzo, and micro levels.
John Underkoffler developed oblong Industries and the Mezzanine system around 1999. The origins of the underlying technology, called “G-Speak,” which is the only operating system in the world that naturally captures space in three dimensions, with each pixel defined by x, y, and z values” —Mezzanine Website.
Underkoffler postulates that he is pioneering a new user interface for human-computer interaction that hasn’t radically progressed since Apple introduced the Graphical User Interface (GUI) in 1984. He is incredibly passionate about the belief that humans will move away from the mouse and keyboard input and that the ability to manipulate data in three dimensions will bring forth discoveries for analytical teams.


Goal
Provide a Multi-level analysis of the Mezzanine 650 suit and examine how the system is utilized at the macro, mezzo, and micro levels.

Persona
Persona
Persona
About
Meghan is a 25-year-old grad student at the University of North Texas, with intermediate computer skills that she learned during her undergraduate studies and professional work. Meghan owns a MacBook laptop computer, an iPhone 8, and a few related pieces of technology and is a regular social media user.
Primary Goals
-
Share Items with Class
-
Move images from the Portfolio to the Workspace
-
Manipulate Size of Images
-
Store images on the Corkboard
-
Delete the Workspace
-
Shutdown the System
Primary Goals
Meghan usually arrives on campus well before class after working a full day. She typically completes her homework over the weekend but often edits and revisits her work before class.
Frustrations
While Meghan has a solid understanding of software she uses regularly, she lacks some confidence when using a new system. She quickly becomes frustrated when the software seems to communicate one course of action when another is best.


Macro Analysis
The following analysis will focus on the macro experience of using the Mezzanine 650 system in room 112 of the Frisco UNT campus. The macro experience centers on the physical experience of using the system within the classroom, how it is situated within the room, and how people interact with it.
This analysis is bracketed to investigate only this classroom. Part of the macro experience includes going to the building’s front desk and checking out the Mezzanine’s wands from an employee behind the desk—while we will mention this within the context of the classroom experience, we will exclude the experience of traversing through the halls to the front desk and its potential issues. Additionally, this analysis assumes that the people who want to use the Mezzanine know it exists but haven’t been trained on how to use it.
Classroom Setup
Classroom 112 measures 35’ by 28’, and its location is in the northwest part of the building. The two doors lead into the room from the hallway, one aligned with the front and one aligned with the back of the room. The front door is kept locked, faculty and students always enter from the back of the room.
An assigned number of desks and chairs in a standard configuration with the desks facing a dry-erase wall occupy the room. These desks and chairs are mobile. The desks are long, measuring about 2 feet by 5 feet.


Television Screens
The Mezzanine’s main three screens are mounted on the left wall and are aligned horizontally, like standard widescreen TVs. There are also two Corkboard screens mounted to the back wall. The five total screens are placed on two separate walls with some considerable distance between them. We assume the setup had to do with only two free walls to mount the TVs in the room.
Touch Screens
The Touchscreen to turn on the Mezzanine’s screens is located along the back half of the right wall. The purpose of the small device positioned next to the computer monitor is vaguely signified by its proximity to the PC and desk intended for instructors. The device is the same touchscreen device used in other Frisco classrooms to control various screens and monitors, so an instructor may already be familiar with its role in managing classroom technology.
Emitter Pods
Mounted to the ceiling are 69 ultrasonic emitter pods. The small, white devices help track the movement of the Mezzanine’s wands in 3D space. A radio receiver that receives information from the wands and sends it to the Mezzanine system is positioned amidst the emitter pods.8 This array of emitter pods plus radio receivers are in the middle third of the room. It’s essential for people using the wands to stay within the borders of this array as leaving the area reduces wands’ accuracy. The room contains a projector facing the front of the room and four cameras that capture any interaction with Mezzanie’s screen or in the room.
Lastly, there are some instructions for the Mezzanine system located in the room. A standing trifold sits on the instructor’s desk and two user manuals are in a nondescript drawer underneath the classroom’s PC rack.

Pain Points
During some testing, subjects were tasked to enter the classroom and use the Mezzanine system. All express the lack of clear instructions, and most miss the small tri-fold that vaguely indicated how to use the system and any other aids that are need it.
The need to check out wands to navigate the system’s interface from a third party outside the classroom was not clear until the instructor requested help.
There is no clear and significant connection that the Touchscreen in the classroom is to be used to turn on the Mezzanine screens. While the placement of Touchscreen signifies that it is for instructor use, its distance from the Mezzanine screens does not indicate their connection to one another.
The layout of this room does not complement the Mezzanine system. The outlets for students to keep their laptops charged for the 3-hour class are far from the display screen, forcing them to continue shift position.
Using the wands to interact with the Mezzanine interface relies on one’s position in the room and connectivity with the emitter pods on the ceiling, which can be challenging since you can’t see them unless you look up.
Mezzo Analysis
The mezzo interaction starts when the user walks into the classroom and wants to turn on the Mezzanine system. In this analysis segment, we will review the physical design, interaction, and supporting components that allow the interaction with the system. The analysis is made through visual observation and interaction with the system through a user's experience.
The Mezzanine system at the mezzo level comprises of three elements, an instructional tri-fold, white wands, and an LED touchscreen that interacts with the environment’s TV screen and user’s personal computer.
Components & Physical Description
Tri-fold Instructions
The instructions on the tri-fold manual are segmented in three ways: connecting to the Mezzanine, sharing your screen, and wand use. The connecting-to-Mezzanine segment instructs the user on connecting to the Mezzanine system via their laptop or other device using a web browser and instructions on downloading the Mezzanine app. The share your screen segment instructs the user on sharing their screen via physical plug-in or wireless connection. The use-the-wand segment illustrates how to turn the wand on, directs the user to point it to one of the screens to display the menu interface and interaction movements.


The Wand
The wand is a triangular tubular-shaped ultrasonic and inertial tracking device measuring 220 x 34 x 35 mm and weighing 97 g powered by a Li-Ion, 3.7V, 1400mAh battery. The wands only function in an environment with fixed emitters pods that communicate with the ultrasonic sensors located on the wand's body. The wand detects the distinct ultrasonic waves that the emitters give off when the wand is on. The wand also houses an internal inertial measurement unit (IMU), an electronic device that measures an object's angular motion, force, and magnetic field, to detect the objects' orientation and motion. The Mezzanine system triangulates the information and converts it to the animation displayed on the system interface.
The Wand
At one end of the wand, you will find three white circular lights and one black button. One circular white light serves as a visual indicator to show that the wand is on or off and alert you of hardware failure. The second indicates the wireless communication strength or RF link, and the third shows the device's battery charge. The black button is the power button, as indicated by the grey sticker that surrounds the button that says "on" and "off."
When powered on, the battery life light indicates the remaining charge with a pattern of beeps and flashes.


The Wand
As we move down from the device's light indicators, the user encounters two black circles positioned at one edge of the wand and two other identical circles parallel to the first circles; these sensors listen to the pulses that the fixed emitters send to communicate the user's motion.
Further down the wand, you see one large colored button on two different sidewalls; they help interact with the system interface. The redundant buttons allow the user to control all functions equally. At the opposite end of the power button and system indicator lights is the charging port.
The Touchscreen
The Touchscreen is the only place where the user can turn "on" the Mezzanine system. At the top of the screen, it prompts the user to "Use the Mezzanine Wand to Control Images on the Screen." Other capabilities include:
-
Initiating a video call.
-
Changing the primary camera from the default projector camera.
-
Controlling volume.
-
Microphone.
-
Conference calls.
-
Muting the ceiling microphone.
A detailed view of its functionalities will be examined in the micro analysis.


Micro Analysis
The following analysis defines components that make up the Micro Layer of the Mezzanine 650 system, the journey of the student through this technological ecosystem, and the recommendations to enhance the collaborative experience.
The Mezzanine system at the micro-level is comprised of five distinct Graphical User Interfaces (GUI).
The following analysis is limited to the interfaces used regularly by the persona, namely the Touchscreen, the Mezzanine Screen Interface, and the Web Interface.
Components
Touchscreen UNT Control
The Touchscreen graphic user interface (GUI) activates the Mezzanine system, allowing the other four GUIs to communicate with the workspace. The Touchscreen GUI displayed on an Extron hardware system used in all UNT Frisco classrooms employs a technology-driven learning experience. The Touchscreen for the Mezzanine system is different from this convention. The user simply touches the screen to activate the Mezzanine system and the main screens, allowing users to interact with the system through a website and on-screen interface.


Screen Interface
The web interface is one way a user can share and control content from the Mezzanine Primary Workspace. This interface is accessible via a custom URL unique to UNT and is only accessible if the user is within the UNT network.
Screen Interface
The room interface displayed on the Mezzanine screens allows users to control and remove content from the Mezzanine Primary Workspace. The interface is controlled via one of the Mezzanine Wands in the room. However, a user on the Web Interface can make changes to the Workspace, Primary Workspace, or Corkboards and influence what is displayed on the screens in the room.
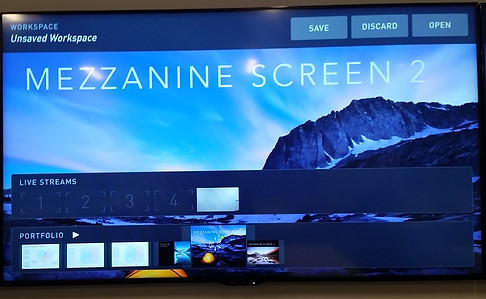
Mezzanine Workspace (Data Layer)
The Mezzanine workspace is a collection of workspaces where content is displayed for viewing on the Mezzanine screens within the room or the Mezzanine Web Interface.
The Mezzanine Workspace is comprised of a Primary Workspace, Corkboards, and Saved Workspaces.
Primary Workspace
The Primary Workspace is the three screens used as a working area for sharing content in a classroom session.
Corkboards
Are the two screens where users pin content to remain visible within the duration of the session.
Saved Workspaces
Is where users can save primary workspaces.
Portfolio
Mezzanine Screen
Web Interface
Portfolio
Screen
Web Interface


Step 1: Sharing Content
To share images with the Mezzanine system, users either upload Images to the portfolio or share the users' device screen with the portfolio. The user performs each task in two distinct ways:
-
Login to the portal via the website Mezzanine.unvn.unt.edu
-
Or share a screen via an app downloaded from http://oblong.com/screencast to a device
Share Items with Class - Upload to Portfolio
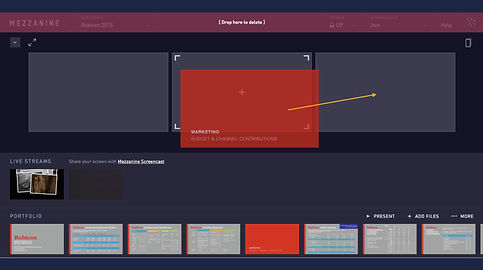
Upon successfully entering the Web Interface, the user sees the following screen. From here, the student attempts to add items from their device to the portfolio. Observations show users delay uploading content until they connect the "Add Items" label to share content in the bottom right corner.
Step 2: Adding and Deleting in the Workspace
Using the wands, the user interacts with the Mezzanine Screen interface to view their portfolio content and selects an object to drag into the workspace. Users can display the same object on all three screens by dragging the object from the portfolio multiple times or different objects by dragging another image to each screen.
Remove Objects from Workspace
To remove an image, the user points the cursor at the image to remove, clicks and holds the wand button to select the image and drags it to the top of the screen until they see the word delete on the screen and then releases the Wand button to delete.


Step 3: Manipulating Content Size
Once the images are placed on the Primary Workspace for discussion, you can use the wands to manipulate their size. Using the mezzo gestures, users will press the button on the wand while moving their hands toward or away from the screen to zoom in or away from the image.
The screen displays indicators on the corners of the image to show the size of the image is in flux, similar to existing conventions on other digital interfaces.
Step 4: Store Content on Corkboard
The corkboard screens are located in the back of the room. To move images to this screen, the user grabs the item with the wand and directs the wand to the Corkboard screens. The gesturing and on-screen signals are consistent with placing images on the workspace from the portfolio.
Step 5: Deleting Content from Workspace
Upon concluding the class, the user can clear the workspace content using the wand. Students can open the menu and choose the "Close" button to remove all content from the workspace.
Step 6: Shutdown the System
The Mezzanine system and screens are powered down when the user presses the "System Off" button on the Touchscreen.


Pain Points
The Mezzanine screen prompts do not paint a complete picture of the functionality available. The most visible indicator to share media is downloading an application separate from the Mezzanine web interface.
The Mezzanine system limits the number of users that may share a screen with the Mezzanine Workspace simultaneously, making it difficult for a large class to collaborate in that environment seamlessly.
Items that are uploaded don't display immediately or indicate that they are ready to be used in the Portfolio view.
Poor functionality descriptors confuse users on their functions and lead to frustrations when interacting with the Mezzanine Interface.
.
Conclusion & Recommendations
The Mezzanine 650 system installed in Room 112 at the UNT Frisco campus is regularly used by a Data Visualization graduate class. The ability for participants to contribute their content throughout the duration of class interactively is facilitated by the system's intended functionality. However, it wasn't until nearly six weeks into the class that most of the students were comfortable using it without stumbling or requesting external assistance. Even at the 14-week mark, some students are still apprehensive of using the system when pressing time constraints.
Recommendations
To ensure future classes are not presented with similar adoption rate challenges, it would be beneficial that the following recommendations are considered:
-
Improve physical signage in the room to indicate how to turn on the system, locate the necessary equipment, and upload content.
-
Orient the physical space to face the mezzanine screens
-
Increase the number of individuals that can share work simultaneity.
-
Relook at current prompts and information architecture of the sharing, downloading, and deleting functions to avoid user frustration.
Assuming these or similar initiatives are employed, the University of North Texas will increase engagement with the system.